Thursday, November 7, 2013

The Utility: Trimming the floor battens

Some days you just don't have a lot of time to make any major progress. Still, there are usually some small things you can do to help the project along. Last night was just such an occasion. I took a few minutes to trim the forward tips of the outer floor battens. Now they match the inner battens, which I'd trimmed a while back. This will look much better than the squared ends once the bottom is planked.


Wednesday, November 6, 2013

The Utility: Preparing for Planking


A fellow boatbuilder pointed out to me that if I cover the transom first, before planking the sides and bottom of the boat, then the end grain of my planking is going to show around the rim of the transom. (Thanks Chris!) Of course, this only poses an issue if you plan on bright-finishing your transom, which is exactly what I’m planning to do. I’m planning to paint the rest of the hull. So, paint will cover the end grain of the transom as viewed from the side.

So now, my plan has changed to planking the sides and bottom of the boat first. The first pieces of planking that go on will be short 4’ aft sections on the sides. I will be butt-joining these pieces to longer 8’ pieces that will plank the forward sections on the sides. This will allow the butt joint to be located in the flatter aft section of the boat, which means it will be easier to do, and there will be less stress on the joint. I have to join the planking in sections like this, because plywood comes in standard 8’ lengths, and my boat is 11’ long.

In preparation for planking these aft sections, I’ve been sanding away dried runs of epoxy, etc from those parts of the boat I can’t easily get to once the planking is on. I’ve also worked to clean up the shape of the seat riser cutouts in frame #1. Still, before I can plank this aft section, I need to encapsulate these frame cutouts, as well as a couple of other places I won’t be able to reach once the planking is on.

Then, God willing, I should be able to begin planking the little boat.


Dried runs of epoxy have been sanded off of frame #1 and gussets. This is the starboard side.

Starboard frame #1 after sanding. The seat riser cutouts still need to be encapsulated with epoxy.

Port frame #1 after sanding.

Port frame #1 after sanding.

Port frame #1 after sanding.

The globs of epoxy are now sanded off of the transom.

Wednesday, October 30, 2013

The Utility: Chines finished. Fairing completed.

I have finally gotten the 2nd set of additional chine strips shaped down to my liking. I'm predicting that all of the faired surfaces will still have to be adjusted a little when the planking is being fitted. That's fine. For the most part, however, I believe the fairing phase is basically done.

The first part of the planking stage will be to cover the transom with a layer of the Meranti Hydrotek. My goal is to bright-finish the transom, and I want it to match the deck. Before I can add another layer onto the transom, however, I have to sand down some remnants of dried epoxy.

Here are some iPhone photos of the progress:


Starboard chine at frame #1.

Starboard chine at frame #1.

Port chine at frame #1.

I have to sand off these bits of dried epoxy before I can add another layer onto the transom.

Friday, October 18, 2013

The Utility: Progress on the 2nd set of chine strips

Fairing these additional chine strips is coming along pretty quickly. Here are a couple of iPhone shots to show progress on the starboard side.

Faired flush with the side of frame #1.
A little more work is needed to blend the ends into the curvature of the chine. It's getting close, though.

Tuesday, October 15, 2013

New plywood & more chine fixes.

With G7 over, it was time to get back to work on the boat. 

In early October, I placed my order for 5 sheets of 1/4” BS 1088 Meranti Hydtrotek with Homestead Hardwoods in Ohio. I received my well-packaged crate of plywood just a few days later. Right off, I was more impressed with the Hydrotek than the Douglas Fir marine plywood I’d been using up to this point. The Meranti has a more attractive appearance, and a much smoother surface. It is also a 5-ply structure, rather than 3-ply like the Fir, so the outer and center plies are considerably thinner. I’m looking forward to using it to plank the boat, although I’ve read that Meranti splinters considerably when it is cut... we’ll see.


My crate of Meranti Hydrotek, fresh off the truck.
 
BS 1088 Meranti Hydrotek
Before I can plank the boat, though, I still have to finish fairing the framework. That means I have to deal with another problem along the chines.

Originally, I had cut 1” deep notches in the frames to receive the chine logs. However, the “1-inch” board I bought for the chines was in reality only 3/4” thick. This turned out to not be a problem, everywhere except frame #1. At frame #1, the chines ended up being recessed too deeply into the frame notches, leaving 1/4” of the frame extending past the chines on the sides of the boat.

1/4" of frame #1 extends past chine log.

1/4" of frame #1 extends past chine log.

Originally, my plan was to simply fair the frames inward to meet the chines. I changed my mind, however, and decided to laminate on a little extra material to this section of the chines, much like I did up forward. 

I cut two strips of 1-3/4” x 4’ Southern Yellow Pine from the most vertical-grained board I could find at Lowes. I planed these by hand down to roughly 3/8” thickness, and attached them with thickened epoxy , centering them with the 2’ mark in the middle of the frame. The next step is to fair these strips down to shape so that they form a fair curve along the length of the chine. Hopefully I can begin to plank the boat not long after that.


Dry fitting the 1-3/4" x 4' strips into place.
The port side strip clamped on while the epoxy cures.

Next step is to fair it down.


Monday, September 30, 2013

Glen-L Gathering 2013

Leave my cares at the dock? Done.

There was an old Chris-Craft ad from the 1960’s I stumbled across online not long ago. I don’t remember which model it was advertising (an early fiberglass runabout, I believe), but I do remember the tagline: “Leave your cares at the dock.”

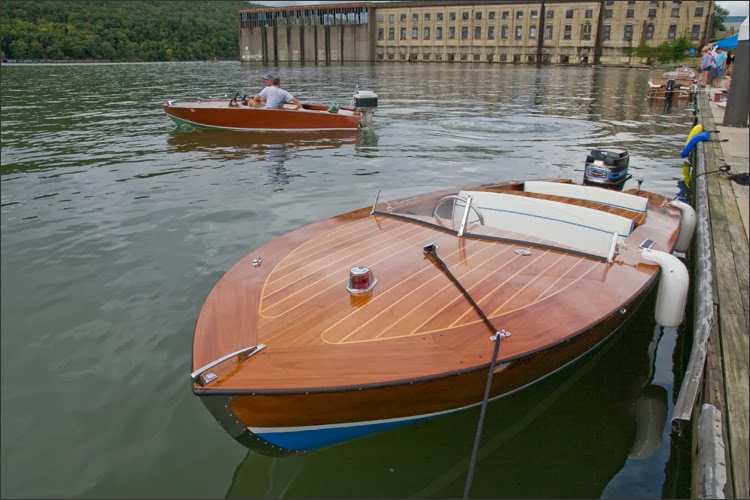
Leave my cares at the dock. That’s exactly what I’d been wanting, and needing to do for weeks. So I did just that — I left my cares at the dock. After all, Sept. 20 was G7 weekend, and the Glen-L boatbuilders were back in town. What better way to relax than riding in hand-made classic boats?

This is now the third Glen-L gathering I’ve attended. Each year brings a little something new. This year, for me, it was an eye-opening lesson in fuel consumption. I simply had no idea just how quickly an outboard motor will use up a full tank of fuel when it’s pushing a boat fully-laden with adults up & down the river for any distance. Wow! I tell you, it makes me all the more grateful to the kind people who took me out for rides in their boats.

This year I rode in a couple of beautifully-finished Zips. I got some ideas to possibly use on my own. I also rode in a very nice Monaco, and in Bob Brandenstein’s splendid Malahini. There was a tent sale this year, and after the gale-force winds Saturday morning (which I luckily missed), I bought a pair of cleats & a U.S. Yacht Ensign flag for the Utility. 


I also bought a bell. My daughter’s been asking me to put one on the boat since I first laid the keel. She saw the bell at the tent sale & just HAD to have it... so I bought it. 

For now I use it to wake her & her brother up for school.


Buddy's highly-modified Zip race boat.

There were several Zips at the Gathering this year.

Docking all these handmade wooden boats in Chattanooga.


1959 Mercury Mark 35A on Garfield's Zip.


I was really intrigued by Garfield's Zip, and all the unique, "out-of-the-box" thinking he put into it.

Paul brought his super-fast Hot Rod all the way down from Quebec

Bob's splendid Malahini.

Jeff Peters' newly-built Zip is adorned with original hardware off of a classic Century boat. I really like his distinctive mermaid fenders.

Monday, September 9, 2013

More fairing on the Utility. This time, the transom.

Warm greetings from Barnacle Mike’s crowded little boat shop. You know, one of the great things about the boatbuilding community is the fact that you meet some really cool people, both online and in person. The level of support and insight that you get from more experienced builders who kindly share their knowledge and give advice can truly help a newbie keep pushing his or her project forward. I’m very thankful for that.

An online boatbuilding friend, who has also been kind enough to follow my blog, sent me an e-mail the other day asking about the status of the Utility. It does seem like I’ve been paying a bit much attention to the Zip project lately. Truth is, I have still been slowly, slowly... s-l-o-w-l-y... fairing away at the Utility all the while. Still, his inquiry about its status gave me a little more motivation to get off my “transom” and put more elbow grease into getting the little boat past the fairing stage. (Thank you, Paul!)

So, that’s just what I did Saturday, fairing away at the transom sides until they were finished. The starboard side had a bit more excess material than the port side. So, I roughed it in with the belt sander, then worked it the rest of the way down with the mouse sander. Unfortunately, I did not follow the “best practice” of checking my work frequently with my test piece of plywood. (I thought the transom sides would be a no-brainer. I was wrong.) When I tested my “finished” work with the plywood, expecting to feel a broad smile cross my face as I witnessed my handiwork, I was disappointed to see several gaps appear. The culprit was an overly sharp bevel in a couple of spots. More gaps to fill with thickened epoxy. I’m getting pretty good at that, if I do say so myself.

Needless to say,  I was more cautious with the port side. I also went about it a little differently. This time, I started by carrying the line of the sheer and chine through the transom material first. Then, I “connected” the two spots by fairing the area in-between. This time I alternated between the mouse sander and a small block plane. I worked slowly and purposefully.

The results were much, much better.

I do still have a good bit more fairing to do, primarily in the mid-section of the boat. I also have to make a decision about the chines in that area, (more on that later). I could’ve worked on all this Sunday. However, yours truly decided he needed some time on the water. So, I spent the day canoeing. I’m sure you understand.

By the way, I met another boatbuilder out on the river. He was piloting a very nice-looking red drift boat upriver. It looked about 16’ long. The handsome-looking boat glided smoothly through the water, pushed by a silent electric trolling motor. He proudly said “yes” when I asked if he’d built it himself. He had some very nice things to say about Don Hill’s drift boat plans before we each went our separate ways. 

Yep. You’ve gotta love the boatbuilding community.

Starboard transom-chine joint after fairing.

Starboard transom-chine joint after fairing.
Starboard transom-chine joint after fairing

Starboard transom-sheer joint after fairing. As you can see, I've got a heck of a gap in that "Marine-Grade" plywood that I'm going to have to fill.


Port transom-chine joint before fairing.

Port transom-chine joint before fairing.
Port transom-chine joint after fairing.

Port transom-sheer joint before fairing. Notice all that epoxy thickened with #2 silica?

Port transom-sheer joint after fairing. I still have some thickened epoxy to file away.