Wednesday, July 13, 2016

Utility christened.


I had been debating on how many coats of varnish to put on the boat. When I finally ran out of varnish completely, I decided that would be a good stopping point.

So, after I let the last coat of varnish sit for a couple of days, it was time to put the name decal on the transom.


Taping the decal into position

Backing removed; decal and premask pressed down meticulously with a plastic keycard

Premask removed
The decal came all the way from Saskatchewan.  I had ordered a material that I felt most resembled actual gold-leaf paint — "22K Florentine Gold." Yes, it was a little expensive. But, the folks at Boat-Lettering.com were easy to work with, and they produced what seems to me a high-quality decal. The font preview / design interface on their website was a fun and convenient tool to use, not to mention a great selling point for their services. 

So, how many coats of varnish are there on the boat? Six coats on the deck, seats, and quarter knees. Five coats on the transom, and three coats on the battery mount and switch panel. In all, one entire quart of Pettit Z-Spar Captain's Varnish 1015 from Boaters Plus. (That includes a fairly high percentage of waste, due to my inexperience using the stuff).

What remains to be done? Well, I'm slowly learning that you're never really "finished" working on a boat. However, the last major remaining task is to finish wiring the bilge pump. This will also involve drilling and water-sealing a couple of holes to run the wire through.

Lastly, I may go ahead and bolt the Nissan outboard to the transom. The last couple of times I went to the lake were pretty rough on my back... taking the motor off of its stand, putting it in the back of the SUV, taking it out again, putting it on the boat, taking it off the boat, putting in back in the SUV, taking it out again at home, and putting it back on its stand....

Sure, it's not real heavy as far as outboard motors go, but all that strain on my back is a bit much.

Maybe I'm getting too old for this ship.


Wednesday, July 6, 2016

4th of July weekend and the "one that got away"

I know. It sounds like the opening line of a fishing story. Well, not exactly...

Earlier this month, I joined ACBS and attended my first ACBS boat show. A couple of people there had some beautiful old Mercury outboards. 


Not long afterward, I decided I'd start browsing eBay regularly, to keep my eyes open for a motor to put on the Zip. I'll need one, eventually. And with plenty of time to browse, I thought it would pay to stay vigilant for a good deal.

I hadn't necessarily intended to put an old outboard on the Zip. However, those old motors sure are pretty, and cool... especially the old Mercs. 

As I was browsing, one jumped right off the screen at me — an absolutely stunning 1966 Merc 500. 50 horsepower, and a short shaft to boot! Not only that, but this motor appeared to have been meticulously cared for. I entered my bid, and kept up with the auction all week. I actually had the high bid on the thing, right up until 15 minutes before the auction closed. Then it QUICKLY got too rich for my wallet, and I was out.

It was gone.

It got away as quickly as that monster catfish I almost caught as a kid. That fish was HUGE. Just as I was pulling it ashore at my grandfather's pond, it swished and splashed violently, broke my line, and swam away. (It was hard to tell in the tidal wave of murky pond water, but I'm pretty sure that catfish flipped me off before swimming away.)

But, I digress...

Bidding on that old motor got my mind pretty heavily on the Zip. So, over the weekend, I decided to take a break from my varnishing work on the Utility, and start cutting transom parts for the Zip.


Zip transom frame and motor board, cut from 4/4 rough-cut mahogany.
The Glen-L plans show the transom drawn to it's aft-most (and therefore smallest) dimension. The instructions recommend cutting the side frame members at a 10° bevel, so that the interior surface of the transom is slightly larger than the aft surface. Similarly, the instructions recommend cutting the underside of the transom frame at a 12° angle, to accommodate the 12° rake of the transom.

Some people do it that way. I used a different method, called "step and fair." Basically, you cut the side and bottom of the plywood part of the transom at 1/8" oversize. Then, you cut the side and bottom surfaces of the frames at 1/4" oversize. When assembled, this creates a "step" profile that you simply fair away.


Here you can see the side of the transom frame is 1/4" wider than the drawn lines on the plans
While I was at it, I also cut the floor member of Frame #4...


So, here is the latest update on Zip parts:


Current Status of Zip Parts
PartStatus
Stem & Breasthook Assembly2 coats of epoxy
Frame 5-1/2Forward face has 3 layers of epoxy. Rear face has 2 layers.
Frame 4Side members cut and notched for sheer. Floor member cut & notched for keel; (keel notch needs to be widened on 1 side)
Transom KneeCoated with 3 layers of epoxy
Transom FrameSide frame members cut 1/4" oversized on outer side. Motor board cut. Floor frame member cut 1/4" oversized on bottom side. Top members cut 1/4" oversized on outer side.
TransomTransom drawn onto 1/4" BS1088 Meranti plywood.

Friday, July 1, 2016

The Good, The Bad, and The Ugly...

I'm making a little more progress on the boat, but not everything is going as I expected.


Sanding the transom.

First coat of varnish on the transom

First coat of varnish on the transom

More varnish on the seats (4th coat), and varnish on the battery mount & switch panel.
1st coat of paint on the bilge pump mount.

2nd coat of paint, pump base epoxied on, t-nut installed.

Completed bilge pump mount.

Completed bilge pump mount.
Bilge pump mount is held in position by one stainless-steel eye bolt.

A lock washer on the eye bolt keeps it in place.
So far, so good. But, now the "Ugly" part...

Back in April, when I attached the deck, I was rather disappointed with the fitting between the deck and the intermediate deck beam. Although the fitting disappointed me, I'd have to say that the deck has proven strong enough, nonetheless. I've climbed across it a couple of times while getting the boat back on the trailer.


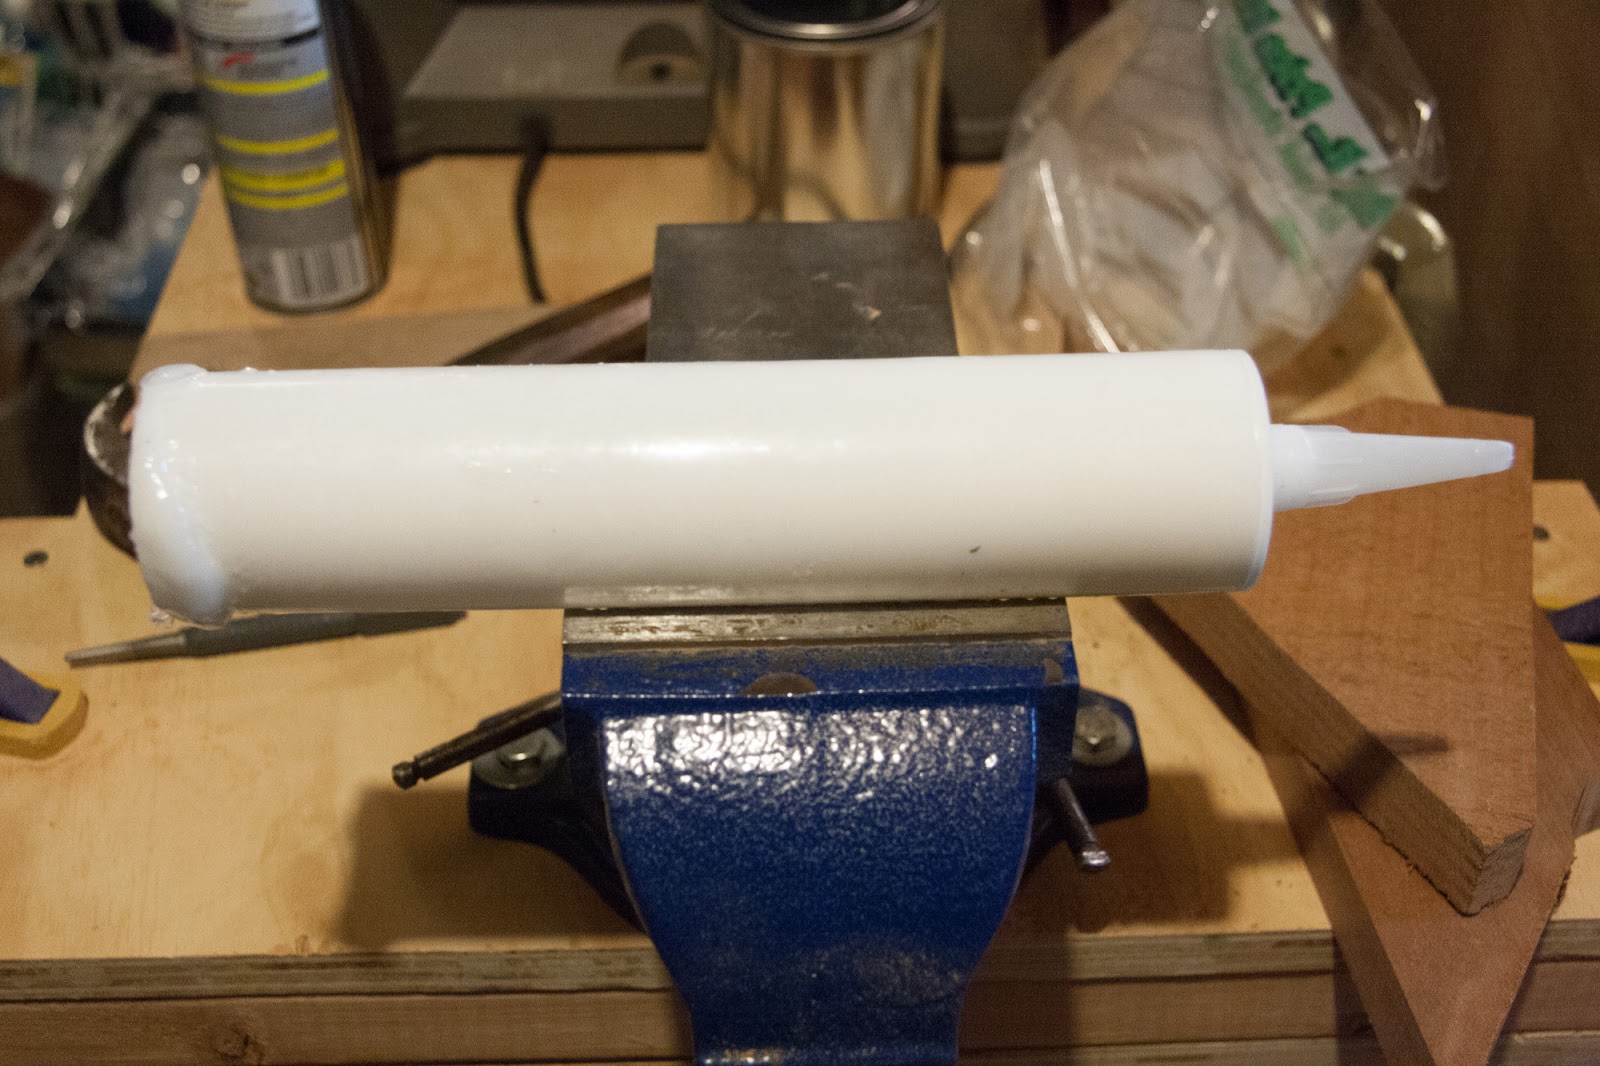
Still, I wanted to fill the gap, just for my own peace of mind. For this purpose, I had bought a pair of empty caulking tubes. The plan was to put thickened epoxy into the tubes, then squeeze the epoxy into the gap as a filler, using my caulking gun.

How did it go?

I don't use the word "fiasco" lightly. However, that's the only way I can describe what happened. In spite of the fact that I snipped the end off of the nozzle to allow for flow of such a viscous mixture, the only place where epoxy went was out the back of the tube, and all over my caulking gun.


I don't think any epoxy even made it into the nozzle.

As you can see, the only place epoxy went was around the stopper, out the back of the caulking tube, and all over my caulking gun.
I can't imagine what caused this to happen. Granted, I did not check to see if the tubes had some kind of seal on the inside (what sense would that make?). I can say that I won't be trying this method again.

Maybe I should just leave the deck well enough alone. As I mentioned, it is strong enough. There's a saying in this neck of the woods: "If it ain't broke, don't fix it." 

Saturday, June 25, 2016

Battery mount installed & a few other things

Let's just get right to the pictures:

I did the touch up painting on the stem, adding two coats of Whidbey White to the battery mount supports...


Here is the actual battery mount, with the Attwood battery box mounting hardware reattached. As planned, I coated the underside of it with 1 layer of thickened epoxy, which I also applied to the top of the supports. I pressed them together, and now it's just a matter of waiting for the epoxy to cure.


Battery mount, epoxied into place.

I arranged my plan for clamping the switch panel underneath the starboard quarter knee. Finally, I was able to justify buying those Bessey variable spring clamps I bought a long time ago...


I marked and drilled the holes for mounting the bilge pump switch to the panel. Here it is, mocked-up in position, before I removed the switch and epoxied the panel into place.


Switch panel, epoxied into place.


I decided how I would mount the removable panel that will hold the bilge pump into position. I'll attach the base of the bilge pump to a 1/4" plywood base. I'll secure the base to the side of the transom knee. Since the flat surface of the plywood will not allow for any rotation, I believe I can safely secure this into place with only one screw or bolt.


Bilge pump panel, assembled & coated with first layer of epoxy.

And lastly, in other news... I added another pair of fender cleats at the back of the gunwale. The last time I had the boat out, I quickly got tired of having to use the rear cleats for both docking lines AND fender lines.


Friday, June 24, 2016

Incremental progress on the battery mount

The last week has been dominated by the tragic and unfortunate death of my ex-wife. Now, I'm back to work on Perseverance... though I haven't got much done.

I'm continuing to work on the battery mount. No major progress to report, but I've gotten the miscellaneous mahogany parts encapsulated with two coats of epoxy. 

The exception is the underside of the battery mount itself. I want to be able to epoxy bare wood surfaces together, when I attach the battery mount to the support brackets. For encapsulation, I will probably just coat the entire underside of the battery mount with one layer of thickened epoxy and attach it to the support brackets all at the same time.


After adding a second coat of epoxy to the support brackets, I used mahogany sawdust left over from sanding the Zip's motor board to thicken the remaining epoxy in the batch. I used that to glue the brackets to the stem.

Next step for the brackets is to paint them Whidbey White, along with touch-up paint on the stem.
I used DAP Plastic Wood to fill the holes on the end blocks of the battery mount.  Here, it is simply resting in position.
Also encapsulated with a second coat of epoxy is this small panel for the bilge pump switch.

I'm planning to install the bilge pump switch underneath the rear starboard quarter knee.


And finally, a couple of photos from better days... in a time and place far, far away. These were taken in northern Italy in 1998. RIP.


1977 – 2016
1977 – 2016

Sunday, June 12, 2016

Building the battery mount

I've had Perseverance out on the water three times now. Something I've learned, not surprisingly, is that performance is improved somewhat by shifting a certain amount of weight forward.


Glen-L Utility
Perseverance at the dock, yesterday afternoon

Part of that has to do with the fact that the boat is driven from the aft seat. Another part of the equation is the admittedly limited power of its 8hp motor. With just me aboard, the 8hp Nissan does a fine job. However, with another adult-sized person in the boat, the motor struggles somewhat.

There is also a necessary balance. As I found out with my son in the boat yesterday, shifting too much weight too far forward makes the boat want to plow at full throttle.

So, back to the point: I wanted to mount the battery forward, to help with planing performance.... or at the very least, to keep from putting more weight unnecessarily in the back.


Sanding the excessive epoxy runs off the side of the stem.
Fitting the battery mount supports.


After a little more sanding on the stem, and filing the notches in the mahogany supports, they finally fit.


The mount itself is also made from mahogany, and will be epoxied to the supports.

My original plan was to bright-finish the whole battery mount, but since the supports are not visible from any angle, I will probably just paint them Whidbey White, along with touch-up paint on the stem.
I'm using an Attwood small battery box, along with the included mounting hardware that fits into grooves underneath the box.

I'll also place mahogany blocks on either side, to prevent side-to-side movement. Theoretically, the included hardware should limit front-to-back movement. We'll see.