Monday, December 25, 2017

Merry Christmas

Merry Christmas to you.

Guess what Santa brought me for Christmas this year?


A note from Santa, and a new router on the way.

Apparently, Santa Claus reads my blog. That's right! Santa left me a gift card to Lowe's, along with a personalized note saying that I might want to pick out my own router.

IT'S A CHRISTMAS MIRACLE, I TELL YOU!! 

The timing couldn't be better, because progress on my dash beam is moving along beautifully. Let's take a look:


Dash, gussets and wedges all disassembled and ready for epoxy.

All my epoxying tools laid out and ready: Chip brush, scraper, kitchen scale, awl (for aligning screw holes covered in epoxy muck), mahogany wood dust for thickening the epoxy, mixing cup, stick, and of course, all the parts staged and ready.
Glued, screwed, clamped, scraped, wiped, scraped, wiped, scraped, and wiped. I can't overemphasize the benefits of a handy scraper and a rag. Notice that I've cut the wedges shorter than the dash to give the dash a little overhang. 

Port side.
With the gussets and wedges permanently attached, I laid out the dash beam on my full-size construction drawing to check it for accuracy. Here, I need to make a couple of notes for future reference...


The dash beam on the starboard side is about 1/8" short in comparison to the width of the vertical part of the frame. I'll probably need to shim this. The topmost part of the crown is slightly high on this side. 

On the port side, the dash beam width and notch is about dead-on. The wedge and gusset may need to be trimmed back slightly. 
So with those observations documented, I began preparing to make the cutout for my instrument cluster inlay.


I started by re-drawing the all-important centerline on the back of the beam. I marked the halfway point, and drew the lateral center of the oval. Then, I attached the template that I designed & printed on my computer. 

The oval is 12" wide, so obviously I couldn't print that at 100% scale on 8.5 x 11 paper. So, I did as I'd learned from my Glen-L plans, and printed the half-width — ALL centerlines clearly marked, of course. I traced one side with the help of some carbon paper, then flipped it over for the other side.

After drawing the oval, I traced over the carbon paper lines with a pencil. I wanted to make sure I'd be able to see the line while cutting. 


With the alignment double-checked, I placed my largest instrument — the Faria tachometer — to make certain there would be enough room for clearance. 

It appeared there will be plenty of room. 

Faria Euro Beige tachometer. 

After checking all the little details, I drilled the pilot hole. 

Before cutting, I decided that there was so much clearance for the tachometer that I drew the oval 1/8" smaller all the way around. 

Then I started cutting it with my jigsaw. 

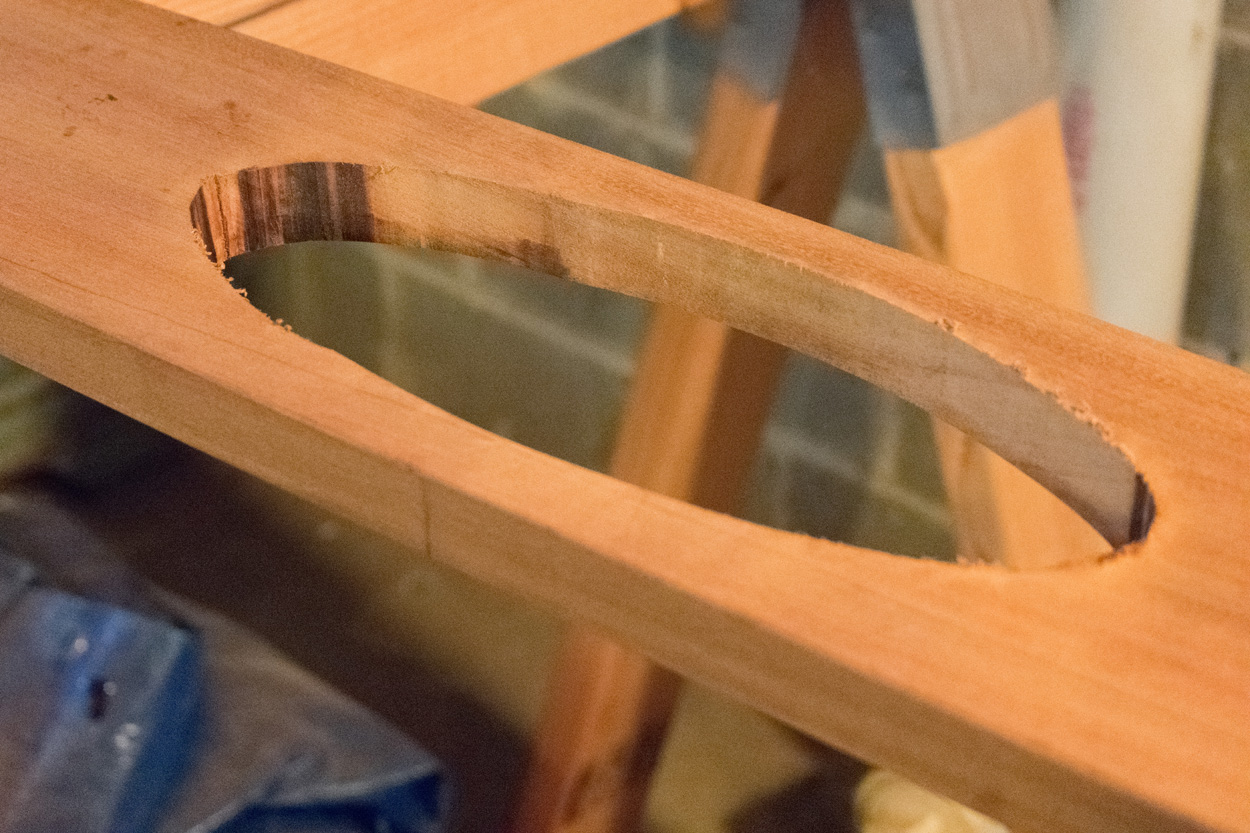
Here, the rough cut is made, but it needs a lot of sanding. 
So, I sanded it. A LOT.

After all that sanding, I'm happy with the oval cutout. The final dimensions are 4-5/8" x 11-7/8".


And now, thanks to Santa, I'll be ready to round-over those edges with a brand-new router... very soon. THANK YOU, Santa! 
And that's not all! In addition to the gift card from Santa, I got another really cool boating-related gift from my boy. He gave me a beautiful, framed art print of Ole Evinrude's 1911 patent illustration for an outboard motor. Check it out:


Isn't this cool? 
Merry Christmas.
13 And suddenly there was with the angel a multitude of the heavenly host praising God and saying: 14 “Glory to God in the highest, And on earth peace, goodwill toward men!”
 — Luke 2:13 – 14

Friday, December 22, 2017

The Slow Saga of Zip Frame #4 — part eight

For me, the pure madness of this holiday season has been tempered by the peace and calm of working on this frame during quieter moments of the day.

Sometimes, those quieter moments have been at 4:00 in the morning with coffee in-hand and my brain in a painless neutral, moving a sanding block back-and-forth.... back.... and forth.

Sometimes, those moments have been late at night after a long and hectic day, with the scent of sanded mahogany blending deliciously with good bourbon.

Enough rambling. Let's start with an epoxy problem I ran into.


Epoxy Problem


You may recall this photo of Frame #2...


This was during the last of the encapsulating process for Frame #2. I had sanded through most of the epoxy, as you can see. I only needed to mix a very, very small batch of epoxy to finish this.

By small, I mean VERY small. I mixed 5 grams of resin with 2 grams of hardener, for a total of 7 grams of epoxy. ( 5 x 1.44 = 7.2 ) My kitchen scale does not show fractions of a gram, so forget about 0.2 grams of accuracy.

Up until this point, the smallest batch of epoxy I'd made was 10 grams of resin to 4 grams of hardener. ( 10 x 1.44 = 14.4) These batches had always come out just fine.

However, I guess the smaller you get with these batches, the more critical the accuracy of proportions. My 7 gram batch just wasn't dead-on. The stuff took forever to cure. For. Ever.

So, if this was during work on Frame #2, how does it affect Frame #4? 

Even 7 grams of epoxy left me with a good bit of leftover, since I only had to cover this one spot on one gusset. Marine epoxy (I use System Three Silvertip) is expensive, and I hate to waste any. So, I took the leftover part and began encapsulating some parts of Frame #4.

Honestly, I'm not sure any of that batch ever cured... not fully, anyway. 

After a couple of weeks, it finally hardened to something usable... but it remained gummy up until that point.

When I sanded it, it was very messy.

My point is: unless you have extremely accurate and precise measuring instruments... be very careful with such tiny batches of epoxy.

Moving on...


Angled Dash Beam


All along, I have wanted to have my dashboard tilted at an angle, like the classic Rivas, Chris-Crafts, etc. I had seen other boatbuilders approach this in different ways... often attaching the dash to angled blocking on the carlings.

I approached it a little differently. A while back, using my planer-jointer, I had made a piece of blocking with a 10° angle. I cut this blocking in half, so that the angle on either side of the dash would be exactly the same. Then, I cut each wedge to match the curvature of the gussets. I sandwiched the wedges between the gussets and the dash beam, giving it a nice angle.


Once all this was fit, drilled, and screwed together, I began to trim off the excess. For most of this step, I used my Porter-Cable multi-tool to cut away portions of the wedges and gussets.

This wasn't really a problem in the areas where the mahogany wedge was solidly pressed against the plywood gusset. However, when cutting through the back of the gusset where it wasn't backed, the meranti plywood splintered badly.


I learned my lesson. On the other side, I sanded it instead of cutting. The result was much better.


With the dash beam set at a ten degree angle, the top aft edge was now slightly higher than the top forward edge. So, the next step was to sand that edge down, or "fair" it, so that the top of the frame was once again perpendicular to the side members of the frame.


So, here are photos of Frames 2 and 4, in their current state:


The next step is to disassemble the dash beam. I'm going to cut some of the height off the bottom of the wedges, to "hide" them behind the dash. I just think it would look better. Then, I'll glue-and-screw the dash beam, wedges and gussets back together.

It may be a while before I attach the dash permanently onto the rest of Frame #4. I still need to cut out an oval in the center for the instrument inlay. I don't yet have a router (ahem, Santa!) to round over the edges of that oval cutout, either. I'd prefer to do all of this work with the dash beam laying perfectly flat. That won't be easily accomplished once the dash beam is permanently attached.

Monday, December 4, 2017

Frame #2 — A year later

So, The Tedious Tale of Zip Frame #2 began when I started building it in December 2016. Now it's December 2017. Yikes! I guess this is what you call working at a snail's pace. Oh well... it is what it is, and it certainly isn't a race.

A year later, what's the status of Frame #2? It is structurally complete, encapsulated with 3 coats of epoxy (4 in a couple of spots), and now I'm working on primer coats on the gussets.


Frame #2, with the gussets in various stages of finish.


The starboard gussets have 4 layers of primer. (On the aft surface, anyway.)


Primer coat #3 sanded and ready for another coat on the port bottom gusset.

Epoxy coat #4, still curing on the port top gusset.

Monday, November 27, 2017

Denatured Alcohol

This time, I didn't use water.

I took the advice of some other, and frankly more talented, boatbuilders. After sanding the surface (again) and vacuuming the epoxy dust away (again), I wiped the surface off thoroughly (again), but this time with denatured alcohol.

WHY denatured alcohol? To tell you the truth, I'm not sure. My best guess is that it evaporates more quickly than water. All I know is, I used it based on qualified advice, and it worked.


Floor beam sanded (again) and wiped with denatured alcohol

I also sanded one of the gussets (again). Looks like I went through the epoxy.

And, I sanded this gusset. Again.

So, after sanding and cleaning, I applied a thin coat of epoxy (again) using a thin foam roller and cheap foam brush as before.


This is what the offending surface looked like before.
Same area, after sanding, cleaning, and a fourth coat.

You can even see my coffee mug reflected in the surface.


Saturday, November 25, 2017

Encapsulating: Make sure it's dry first.

So, what's the great mystery about applying the third coat? Procedurally... nothing. It's the same as the first two coats:

  1. Sand it.
  2. Clean it.
  3. Epoxy it.


Let's revisit that "Clean it" step. The way I do it is to vacuum the surface thoroughly, and then wipe it off thoroughly with a moist rag. This is all to remove the epoxy dust left from sanding.

However, what happens if you sand the previous epoxy coat(s) a little too thin? Apparently, moisture can indeed get through it and into the wood. If that happens, I have learned to wait as long as necessary for the surface to dry thoroughly.

Otherwise, you get this:


So, guess who's getting sanded for a fourth coat of epoxy?

Thank you for taking time to read my blog. I hope you had a happy Thanksgiving, and a sane Black Friday.