Sunday, December 27, 2015

Recent sinking has me seriously reconsidering flotation foam

Glen-L Crackerbox design

Not long ago, a builder in Ireland completed his construction of a beautiful Glen-L Crackerbox. The Crackerbox design is a 15' rear-cockpit, inboard speedster that is reminiscent of the "Gentleman's Racer" boats of the 1930's.

Last spring, this beautifully-constructed boat, named "Old's Cool," sank in Lough Ree. 


These are among the last photos of Old's Cool before she sank.
While out on the water, a hail storm quickly brewed up, rapidly churning large waves from what had been a calm lake. Although carefully trying to navigate the rough water and return to the boat dock, a hard descent off of one large wave sent Old's Cool diving directly into another. Water came over the deck, swamping the engine. With no forward power, and unable to steer, Old's Cool took two more waves broadside. She filled with water and sank within 30 seconds... too fast to even make an S.O.S. call.

Fortunately, the boat's owner survived the incident unharmed. The incident is a chilling reminder of just how fast something can go wrong on the water. So much time and effort goes into building these boats, and it's a tragedy when something like this happens. But it can happen, in the blink of an eye. I hope that his efforts of locating and raising the boat will soon be successful.

I learned about this incident only recently... not long after I'd heard a similar story of another home-built boat that sunk in North Carolina in 2003. A man had built a replica of a 1934 Gar Wood Speedster. On the boat's first voyage at the 2003 Lake Norman Antique Boat Show, the boat's owner was racing another boat. He lost control, and the boat barrel-rolled and sank to the bottom of Lake Norman. After 11 years, the boat was located and raised in 2014.


I don't pretend to compare my little Utility boat with either of these fine craft. However, Perseverance now represents to me the better part of four years' work and dreaming. And, if either of these fine boats can sink in the blink of an eye... so can mine.

So, I'm now seriously reconsidering flotation foam. The question is: "Where to put it?"

There aren't a whole lot of options. It's a small boat, but there is a good amount of unused space up forward, beneath the deck. I have considered adding a bulkhead at the crossbeam of the deck framing, then filling the area forward of the bulkhead with flotation foam. Would that provide an adequate amount of buoyancy to keep the boat from sinking? Who knows. One potential problem is that, in the event the boat fills with water, flotation foam at only the bow would at best keep the boat afloat vertically. In such an event, it might be better than nothing, as long as the boat could be retrieved before sinking.

Other options might be to add some foam under the seats. That might mess up the simple, classic aesthetic of the boat.... but then again, who cares about aesthetics when the boat is filling with water?


One option might be to fashion a bulkhead at the point of the forward-most deck beam. It should be relatively easy to fill the space with flotation foam before the deck is constructed.


If this forward-most area was filled with foam, it would be out of the way enough to not interfere with adequate storage are for life jackets, etc. But, would it provide enough buoyancy to keep the boat from sinking?
Under the rear seat? Perhaps. The trick would be blending it with the aesthetic of the boat, and not restricting water flow in the bilge.


The Great Boxing Day Miracle of 2015

Miracle? Okay, so maybe I oversold that just a little. 

However, yesterday I did indeed finish painting approximately 4 feet of the port sheer. I also reattached a couple of pieces of hardware.


The rest of the port sheer painted, with oarlock and fender cleat reattached.

I got these little spring-loaded stainless steel fender cleats at Academy Sports.

At this point, the painting is finished — at least for the white and green.
 All the brightwork remains to be varnished, however.

Friday, December 25, 2015

Merry Christmas

Merry Christmas to you.

With the last hours of Christmas Day ticking away, so are the tasks for painting the boat.

I've painted over the permanently-attached blue painters tape with whidbey white. So now, the remnants of blue are no longer visible under the sheer.

With the touch-up painting completed at the aft of the boat, it was finally time to attach the rear thwart. So now, both seats are finally attached for good. 

I've filled in the gaps on the sheer, coated them with primer, and painted over them with the sea-foam green. All that remains to be done is a third coat of paint on a very short portion of the port sheer. That can wait 'till tomorrow. Or the day after.


Clamping the rear thwart into position while the epoxy cured. I used the reversible clamps as spreader bars to push down on the ends.

The rear thwart had a slight bend in it — a result of the cheap 3/4" plywood substrate I'd gotten from Home Depot. When I attached it with epoxy, I wanted to make sure I pressed out the bend.

The rear thwart, finally attached... permanently.


With the starboard sheer now painted, I've started reattaching the hardware.

Perko side-mount horn oarlocks


Starboard fender cleat

Starboard fender cleat
Gap on the port sheer, before being filled.
Gap filled with thickened epoxy....
...and the same area after 1 more coat of primer + 2 coats of Sea-Foam Green. Only 1 more coat to go.
It has been an.... interesting.... Christmas. Warm enough for t-shirts, but with torrential rains, thunder & lightning. I got to play Santa Claus, of sorts... inasmuch as I was walking around on the roof at one point. But, instead of delivering toys in a serene, snow-blanketed winter wonderland, I was clearing the gutters in order to keep untold hundreds of gallons of rain water flowing, even as I was getting drenched in the process. 

Then there was the small lake that was forming in my back yard. All of the drains for the french drain had gotten clogged with leaves. The whole area was under so much water that it took me a while to locate all the drains and clear them. It was a little unnerving to be trudging through ankle-deep water beneath a dark sky flashing with lightning and rolling with thunder... but it sure wasn't boring.

For an area that couldn't be cleared by the french drain, I used a garden hose to siphon out the muddy water. Getting a mouthful of that was hardly "a Christmas bowl of Smoking Bishop," but it had to be done.

I shouldn't complain. Rather, I should be thankful that at least it wasn't cold outside. It was actually warm enough to be comfortable in the rain. And, since it's well above freezing, we won't have to worry about ice on the roads.... and I'm sure the local flood waters will recede in a couple of days.

If not, at least I know my that boat does indeed float. Hey... you've gotta look at the bright side, right?

Merry Christmas.

Sunday, December 13, 2015

Slow December days

Work on Perseverance has slowed to a crawl during the holiday season. Mostly I've been painting... little by little. I've also been filling in gaps here and there that I didn't see until I'd painted primer on them. 

Slowly but surely, I'm narrowing the tasks down until it will be time to install the deck. I don't foresee that happening until January (at least). But, I'm in no real hurry at the moment.


I've finished encapsulating the rear seat with epoxy. It's ready to be installed permanently, but I'm not quite ready to do that yet. So, in these photos, it's just sitting there.


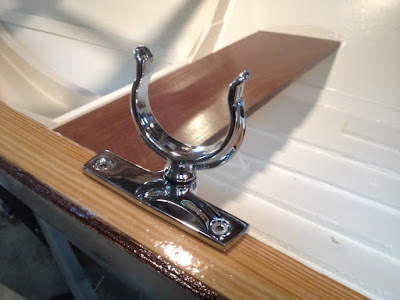
Perko side-mount oarlock; horn style

I've drilled the holes for the oarlocks (Perko — American made!), and screwed them into place. I wanted to do this before I finish painting the sheers. For now, I've taken them back off so that I can paint.... and fill in more gaps, as it turns out.


I've had to do a little touch-up painting, such as these spots on the transom where the grey primer is showing.


This photo is actually of what you're not seeing: little gaps and gouges in the starboard sheer that I filled in with thickened epoxy. The gaps are in-between the plywood planking and the topmost portion of the sheer. The gouge was a small spot where the inner lamination of the sheer (Southern Yellow Pine) was lower than the outer lamination.


I also had to fill in a couple of spots on top of the transom. Here, I've added primer (AquaGuard 190) on top of the epoxy "filling." Next will be added coats of the Sea Foam Green.


AquaGuard 190 primer and AquaGloss Sea Foam Green on the port sheer.


When I was coating the underside of the sheer with epoxy, I'd taped off the inner part of the plywood planking (because it was already painted) with blue painter's tape. The epoxy basically impregnated the tape, and it's not gonna come off without a fight. So, I decided to just paint over it. Here's the first coat on the port side.

A nice note on the System Three WR-LPU paint: I had added all the remaining cross linker to the rest of the paint a couple of months ago, when I was painting the inside of the hull. I had concerns that this might have made the rest of the paint solidify in the can in the time since. But, so far, it has not.


Permanently-attached blue tape on the starboard side. I'll be painting over this, too.


This photo is just to illustrate how I copied the shape for the quarter knees from the transom knees. The original plans call for a simple triangular piece here, but I wanted the classic curve.


Last, but not least, here is another pesky gap between the planking and the sheer that was all but invisible until I added the primer. I'll fill this in with thickened epoxy whenever I attach the rear thwart — I'm running very low on epoxy & don't want to waste any more than necessary.