Wednesday, August 29, 2018

Zip: Floor battens installed

Once the half-lap joints were reinforced, it was time to install the rest of the floor battens.


Then, of course, I needed to start trimming them.


Those builders of Glen-L Zips who choose the optional 3 battens per side arrangement all seem to go about it a little differently. The battens on my Zip are all 2-1/4 inches wide. The inner battens are on 7-inch centers from the keel. The battens themselves are all on 6-inch centers from one another.

That's one milestone reached on this project, but a long, long way to go.

Utility transom drains installed

I finished the interior touch-up paint around the new transom drains. Let's take a look at the before and after of this near-fiasco:


Before:


After:


Plenty of room behind the bilge pump for the starboard drain plug.
Let's just hope they're watertight.


Friday, August 24, 2018

Zip: Scarf Joints, Half-Lap Joints, and Floor Battens

When I went back to the lumber yard to buy more mahogany, they only had 8-foot boards available. So, I bought a couple.

When I got them home, my son helped me rip the wider boards into 2-1/4" widths to use as floor battens on the Zip.

The next challenge was to make 8-foot boards ten to twelve feet long.

The preferred method for this, without question, is to use a scarf joint to join two pieces together. The longer the scarf, the stronger the joint. A 1:12 ratio is optimal.


However....

To accurately make these cuts for a scarf joint on my table saw, I would need a lot of room to maneuver and support these 8-foot boards. In order to make that room, I would need to move quite a bit of stuff around, build a sled for the table saw, and enlist my kids' help in supporting the boards as I made the cut.

To me, it seemed so much easier to simply clamp the boards to my work bench, and cut away sections for a half-lap joint with my router.

The Case for Scarf Joints

Scarf joints are simply stronger than half-lap joints. In many places, I've seen them described as being almost as strong as solid stock. They have a particular advantage of withstanding bends better than half-lap joints, which will fracture much more easily.

The Argument for Half-Lap Joints

My thinking is: the joints in these floor battens will be located in the aft section of the hull, where there are NO bends. Not only that, but just because a scarf joint is stronger, does not mean the half-lap joint is weak. The question is, will it be strong enough to do the job?

In this particular case, I think it will be. As I said, there are no bends involved. Besides, part of my plan includes adding a strip of 1/4" plywood backing over the joint, just as with my laminated keel. The joint, therefore, will be sandwiched between 2 layers of plywood: the backing (or butt block), and the hull itself.

The Jury is Still Out

I decided to go ahead and try the half-lap joint. 

It was easy enough to do with my router and a 3/4" rabbeting bit. The boards themselves were rough-cut, 5/4 mahogany, so it took more than a 1/2" bit to do the job. 

I placed an 8-foot board and a 3-foot board lengthwise on my work bench, aligned & butted them up against each other, and clamped them firmly into place. After deciding on a 4" overlap, I clamped a stop guide for the router across the top of the boards. Then, it was simply a matter of cutting away with the router.


4" half-lap joint, after sanding away all the epoxy mess.


I glued the pieces together with thickened epoxy, and clamped them firmly together. Once the epoxy cured, I was honestly surprised at the strength of the joint. However, I still wanted it to be stronger than it felt, so I continued on with the plan to add plywood backing.

For the butt blocks, I used 1/4" Douglas Fir marine plywood. I've found that the Douglas Fir plywood is considerably more rigid than the Meranti, and in my opinion it's better suited to this type of application. The butt blocks are 23-1/4" long, centered over the joint.


Once these butt blocks were epoxied into place, I was very happy with the strength of the joint.

After re-reading the section on floor battens in Glen L. Witt's Boatbuilding With Plywood, I also came away with an idea for how to reinforce these joints even more. It depends on how I want to build the floor. I'm still considering my options. For now, it's time to move on to notching these battens into the frames.

Tuesday, August 21, 2018

And the rains came.

There is still painting to be done, particularly on the inside of the boat.

However, I did manage to stay ahead of the rain... barely. Everything is epoxy-coated and under a couple layers of paint.

And most importantly, now that the rain has started: functional


Testing the transom drains. During actual use, the plugs will be on the inside.


Sunday, August 19, 2018

Redemption?

Progress is coming along nicely on the transom repair.

It looks like everything's going to be fine, but we won't know for sure until the boat is in the water. In the meantime, let me catch you up on the progress.

Here's where we left off:


I had cut a 1-1/4" diameter x 2" long plug of mahogany with a hole saw, filled the pilot hole with thickened epoxy, coated everything (heavily) with thickened epoxy, and tapped it into place with a hammer. 

Ugly. But solid.

The next day, I very carefully re-cut the starboard hole to where I wanted it to be.

Starboard hole re-drilled & sanded.

This put the top of the opening where I wanted it to be, but it also now created a gap at the bottom, as you can see in these next photos.


At first, I planned to simply fill this in with a lot of thickened epoxy. That probably would have worked fine, but another thought occurred to me.

The big 2" chunk of mahogany I'd cut the plug from was still sitting on my drill press, underneath the 1-1/4" hole saw. I realized that, if I aligned the hole saw slightly off-center from the hole, I could cut a 2" long crescent-shaped shim.


I then coated the shim in thickened epoxy, and pressed it into place.


This, of course, left another ugly mess once the epoxy had cured. So, I ran the hole saw back through the hole to clean up the inner diameter. Then, I spent some time sanding, filing, and chiseling away the excess in order to create a nice, flat surface for the drain tubes to mate to.


I regrettably don't have any "before" pictures of the drain tubes. I'll try to describe this part succinctly:

I used Moeller 1 x 3 tubes that I bought from Jamestown Distributors. These are made from thicker, heavier brass than the Seachoice tubes you might find at Academy Sports or Walmart. The Moeller tubes aren't as "pretty" (meaning shiny and polished), but they're definitely stronger.

The tubes come flared at one end. I placed the tubes in the holes, and marked approximately 1/8"  extended past the transom. To do this, I simply held a fine-tip sharpie flat against the transom, with the tip on the brass tube — and rotated the tube to create the mark.

I cut the tube off at this mark with a pipe & tubing cutter.

The installation

I mixed a batch of epoxy, and using double layers of latex gloves, I coated the inner diameter of each hole and all other exposed-wood surfaces in order to water-seal it.

Then, I added mahogany wood dust to the remaining epoxy and thickened it heavily. With this mixture, I coated everything — and I mean EVERYTHING — the inner diameter of the holes, the outer surface of the tubes, and any / every mis-cut that needed to be filled.

Then I inserted the tubes from the outside in, using a twisting motion to make sure as much epoxy as possible remained between the tube and the wood.

To flare the tubes, I used a flaring tool that I'd gotten from another boatbuilder (who actually launched his boat for the first time yesterday — congratulations!). I believe the flaring tool was a Seachoice or SeaSense brand. Plenty of boatbuilders say you don't really need one of these tools. I haven't tried their described methods, but they apparently do work. For my part, I was glad to have the flaring tool.

In the process, I got epoxy all over everything. I made a helluva mess, and it took forever to clean it up. But, in the end, I was left with this:


Starboard drain tube

Port drain tube
Obviously, this mess needs to be painted now. Stay tuned, and God Bless!

Sunday, August 12, 2018

Holes in the boat

Last time I took the boat to the lake, there was just too much standing water in it. That's just the reality of storing a boat outside — especially a boat with no drain holes.


That's just too much standing water.
So, I decided to install some drain tubes. The first step, of course, is to drill holes through the bottom of the transom. 

With my patron saint, Clark Griswold, looking over me... I took my new 1-inch hole saw, and things went very, very wrong.


"Dive! Dive! Dive!" No, I'm not building a replica U-boat. Ugh. What a mess!

Let's back up a little.

The obvious place to start was a cutout I'd made on what was originally intended as a sole support. I had left this gap for the very purpose of adding a drain tube if I ever chose to. So, I placed the flared end of my Moeller brass drain tube in position, and marked the area to be drilled.


Here, you can see the brass drain tube, the 1" hole saw, and the space for the hole.

Marking the location for the hole.

The initial cut.
I placed the drill bit at the center of my mark, and started drilling away. Once the hole saw made contact with the wood, I tried to make sure the saw was perpendicular to the transom, and began cutting.

The hole got deeper, and deeper, and I kept waiting for the drill bit to exit the other side of the transom. Then, I began to think: "What if this doesn't come out where I want it to?"

Amazed at my own wisdom, I stopped cutting, took the saw part off of the drill bit, and drilled all the way through — just to make sure it came out in the right spot. Guess what?


The first exit wound.
I reassembled the hole saw, and held it in position at the back of the transom. I immediately realized that if I continued with this cut, I would actually drill through the bottom edge. This would not only mean a hole in the bottom of the boat, but no place for the drain tube to be flanged on the outer side.

There was NO WAY this was going to work. So, I relocated the hole saw where the hole should be, and began drilling inward from the outside.


Relocated pilot hole.

Almost through.
Once the hole was all the way through the transom, it looked like this:


The center of the NEW hole, relative to the position of the first one.

Here's the drain tube placed into the NEW hole. Not pretty... but workable.
The next step was to cut away a portion of the sole support on the other side of the transom knee. I was thankful that I'd made a removable base for the bilge pump. Otherwise, I wouldn't be able to reach where I needed to cut.


Bilge pump out of the way, and initial vertical cut made.

Cautiously cutting the notch with my Porter Cable multi tool.
Now that experience had taught me the wisdom of drilling from the outside in, I started the second hole (okay.. third... whatever!).

I measured and marked the spot for the pilot hole, giving myself a little added room to clear the transom knee on the inside of the hull. This time, the pilot hole was in the perfect location.

What could possibly go wrong?


Yep.
I ran the hole saw right into the starboard transom knee, scalloping away a portion of it.

Although the hole was in a technically functional position, there was absolutely zero clearance for the flared end of the drain tube.


— Now, in retrospect, I could've made this work. How? By simply not flaring the inner end of the drain tube. I could've made the seal with copious amounts of thickened epoxy. Sure, it wouldn't match the look of the port-side hole, but this side is hidden behind the bilge pump, so it wouldn't really matter. I wish this had occurred to me at the time. But, to quote the classic Asia song... "It was the heat of the moment." —

"No problem," I thought. "I'll simply widen the hole from the inside outward, and fill in the gap as needed later."

But there was a problem. The width of my drill would let me get the hole saw nowhere near the center of the original hole to make an "adjustment". So, I placed it as close as I could, and started drilling. What I wound up with was:

One elongated mess of a hole on the inside...


...and almost two completely separate holes on the outside.


Naturally, this would have to be fixed before I could proceed with my "adjustment."

I've actually seen other boatbuilders fix problems far worse than this one. So, I knew I could fix this. But how?

For starters, I took a slightly larger hole saw (1-1/4" diameter), and cut a plug out of some 2" thick mahogany scrap.


Then I packed the pilot hole with some heavily-thickened epoxy. I liberally coated the inner diameter of my transom mess with the same mixture, as well as the outside of the plug.

Then I tapped it into place with a hammer.


Don't say it. I know what it looks like.


Once all that mess cures up, good & solid, I'll find a way to finish "adjusting" the hole. The boat's name is Perseverance, after all. I don't give up.


Saturday, August 4, 2018

More Utility updates

In the last post about the Utility, we left off mentioning some updates I had planned for the boat — specifically including a way to mount the trolling motor without cramming it up against the outboard.

It took a while, conjuring up all sorts of design ideas, until I finally decided on a simple and easy solution. I decided to make a removable bracket for the trolling motor that would simply bolt to a piece of blocking on the inside of the transom.

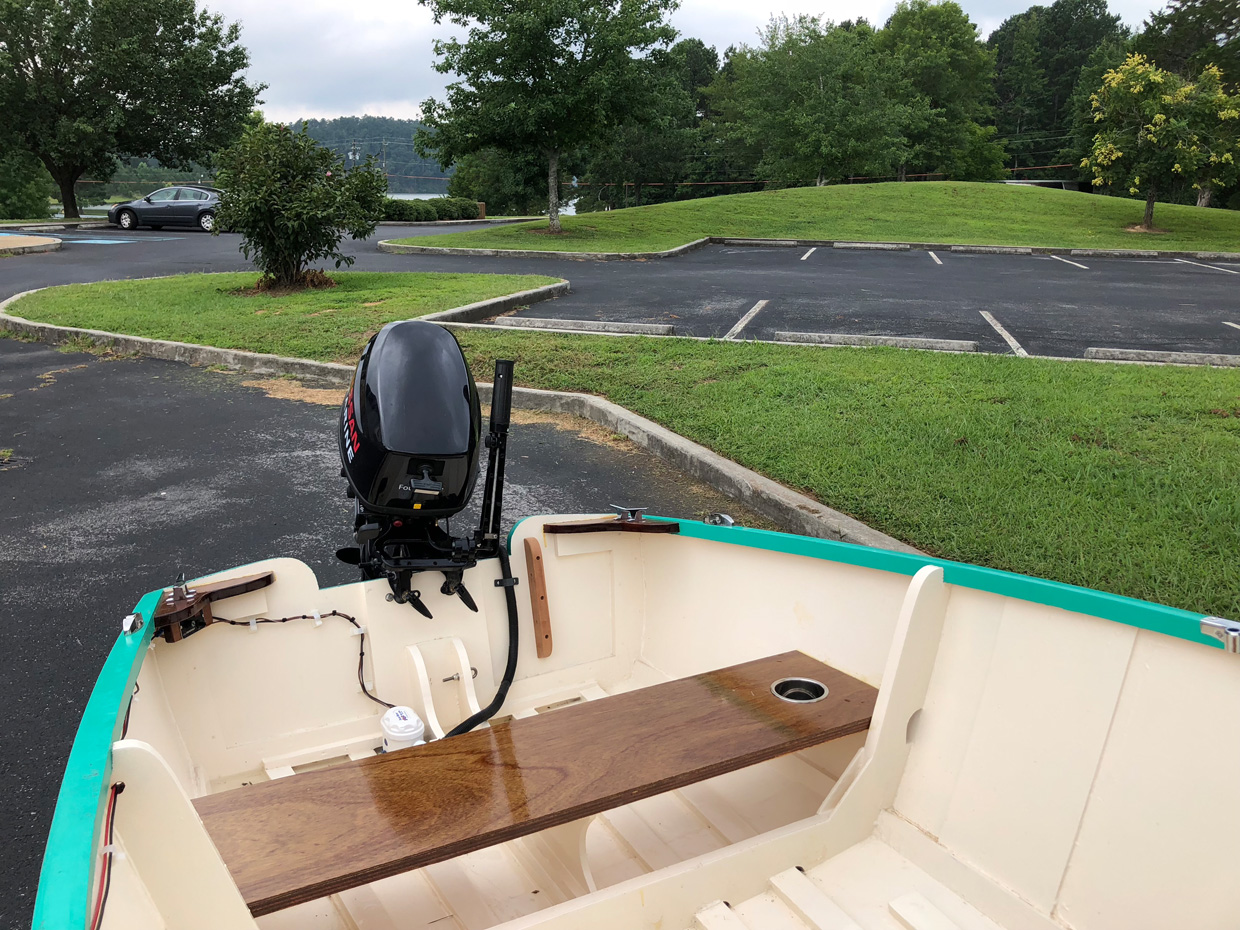
Here it is, mounted on the boat:


The removable part simply bolts on to the blocking inside the transom with two stainless steel carriage bolts, and wing nuts with lock washers.


The bracket allows the trolling motor to be mounted sufficiently far away from the outboard so that it is easy to use. Here is a back view with the trolling motor attached. You can see wood filler on the bracket, as I'm still in the process of finishing these pieces. I plan to bright finish them so they accent the painted parts of the boat.


Back at the lake, with the trolling motor bracket removed. The blocking is still unfinished


At the lake on another day, testing the bracket in actual use for the first time. (It works very well.)


Here is the removed bracket, with a couple layers of epoxy on it. I'm still in the process of finishing these pieces.


A couple of other new additions:

I made some simple steps for the trailer. This makes it much easier and more comfortable climbing into the boat while it's on the trailer. I made these from leftover scraps I had laying around, tread tape, and some 5" galvanized bolts with lock washers.


I decided I needed a small cooler that is color-coordinated with the boat. The aquamarine on the cooler isn't a perfect match for the sea foam green on the boat... but I think they go together okay. These little Igloo Playmate coolers are great, (and inexpensive). A Yeti it is not, but for a day's outing on the water, it gets the job done.


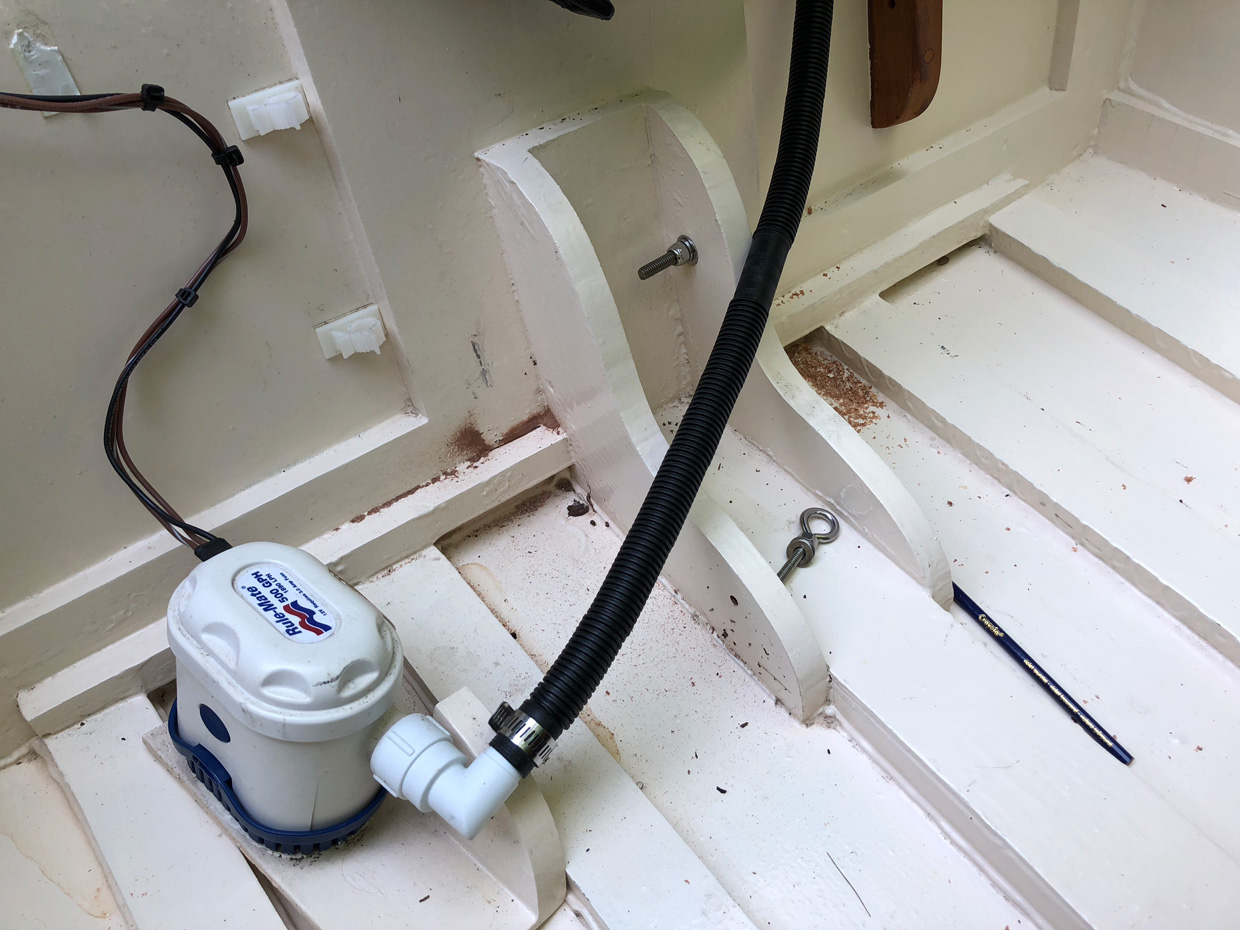
Today, when I took the boat back to the lake, I saw far more water inside it than I wanted to see.

It has been raining a lot lately. The boat cover I bought does a good job, (particularly with the plywood half-cover I made, but it's not exactly watertight). 

When I saw how much standing water had been sitting in the boat for a few days... I seriously reconsidered my view on transom drains. I think I'm gonna install some.


I'm planning to add a plywood floor in-between the seats.


I'm also planning to relocate the battery from the front of the boat to underneath the rear seat. This will make it much more accessible when using the trolling motor. 


Hot coffee on the lake, early in the morning. Perfect.


On the subject of finishing the trolling motor bracket... I decided to also make some cosmetic improvements in the boat. A lot of the fit and finish on the inside of the boat is... well... let's call it "utilitarian." I'm sanding away epoxy runs, etc, and doing a little touch-up paint. Since the boat is stored outside now, I'm just doing small sections at a time rather than take on the whole interior at once.

A bit of surface sanding on the port side of the transom.


Taping it off...


One coat of paint...


Two coats of paint...


A little more touch-up paint, and the tape removed.


Hopefully, these updates will improve the overall look of the interior.