Sunday, March 31, 2019

Non-skid

Yesterday was a beautiful day... sunny with clear skies, and comfortably warm without being too hot. In-between grilling pork chops and doing battle with a coven of red wasps for control of my new deck, I spent quite a bit of time working on the boat.

The Utility boat, that is. Mostly painting. That included making a non-skid surface for the new floor boards, which are almost ready to install.

Here's a photo of the ongoing cosmetic repairs to the aft floor battens:


Paint layer # God-only-knows-what-at-this-point.
For the non-skid surface on the floorboards, I simply mixed some sand with a little paint. I used sand from the hobby section at Wal-Mart... nothing fancy. I mixed a heaped teaspoon of sand with about 1/3 of that yogurt cup you see in the background of paint. Then I rolled it on with a thin foam roller. I'll roll on maybe 1 more layer of paint on top of this, after the boards are installed in the boat.


The paint along the top of the transom also needs a little touch-up.
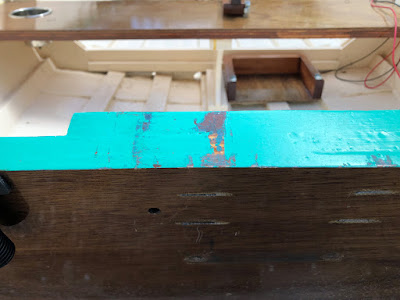
Scuffs and scratches from taking the motor off and on several times.

This over-paint along the edge of the sea foam green has always bothered me. I'm going to try to clean that up.

Sanded and primed with AquaGard 190 primer.

Overhead shot, showing where the floor boards will go.

Almost there.

No reason for this photo, really. I just like the artwork.
Yesterday was indeed a beautiful, sunny and warm day. That was yesterday. Today, it's too cold and wet to get much done outside. Perhaps if it warms up, I'll try to get those floor boards installed. For now, I'm just gonna make another cup of coffee.

Peace.

Thursday, March 28, 2019

The slow and tedious steps

A thousand little tasks is how all this gets done. There are moments of excitement and revelation, and long spans of drudgery in-between.

That's what it has been like this week, as I slowly make my way through tasks on both the Utility and Zip projects.

Utility
For Perseverance, my Glen-L Utility, that has meant encapsulating the new floorboards. The encapsulating process eats up a lot of time, just due to each layer of epoxy needing to cure for at least 24 hours. And, for a good encapsulation job, you need at least two layers of epoxy... preferably three.

That means, even a simple encapsulation job on a couple of relatively minor parts like this is still going to take several days. But, once the encapsulation is done, I can begin painting.


First coat of epoxy, sanded in preparation for the second coat.

Yogurt cups, (at least the ones shaped like this), are great for mixing small amounts of epoxy.

The second coat, freshly applied and curing. I'm taking special care to encapsulate the edges, where the piece is most vulnerable to delamination.

Zip
For the last couple of weeks, I have been working on the Zip during the 5am hour. At that time of day, I need a brainless activity that requires little or no thought while I drink my morning coffee. Sanding fits that bill nicely.

I've been cleaning up the seam and topside edge of the laminated starboard chine. Not real exciting, but it needs to be done. It's coming along... slowly.

Sunday, March 24, 2019

Utility updates: A floor... of sorts.

Way back in September, I mentioned that one of the updates I had planned for Percy was the addition of a floor.

Originally, I didn't want to bother with a floor. But, that all changed when I rode in this boat:


This is also a splendid Glen-L Utility. This particular boat was built to 12' LOA, and as you can see, it has a plywood floor as shown in the plans. When I first stepped aboard this boat, I found it much more comfortable to step into than my boat. (Come to think of it, this boat may have also influenced my wish to use my trolling motor.)

I had one last scrap piece of BS1088 Meranti that I thought would be big enough to cover the floor from side-to-side.


Unfortunately, it wasn't quite wide enough to span from chine-to-chine, as I'd hoped. It also wasn't quite large enough to span from Frame 1 to the forward thwart, either. I really didn't want to go buy another sheet of plywood just to build a floor.

Then, the idea struck me to do this:


I could cut the Meranti into two separate pieces, and use them as individual floor boards on the port and starboard sides of the keel. They'd be large enough to make for more comfortable footing when boarding & disembarking, yet small enough to still allow a reasonable amount of access to the floor for maintenance, etc.

I'm going to give it a shot. The epoxy is curing now on the first encapsulation coat.

I also want to clean up this epoxy mess on the side of the keel before I attach the floor boards.


In other news...

Let's take a look at the ongoing cosmetic repair to the aft floor batten on the starboard side:


Before.
After.
"Making good progress," to quote a wise and talented boatbuilder. This cosmetic repair has spilled over into the adjacent part of the floor. It's coming along. Here are a few progress photos.


Paint a thin layer. Let it dry. Sand it lightly. Repeat.

Last (third) layer of epoxy on the trolling motor mount, lightly sanded.

First layer of varnish.

Friday, March 15, 2019

New battery tray installed; Progress on Utility updates

It was a good afternoon to work on the boat. 

My kind of Friday. Left work a little early. No pressing commitments. Beautiful weather. 

The golden light of the late afternoon sun lit up the boat's varnished brightwork to a glowing orange. It was a really striking sight to see... as long as you didn't look too closely at my varnish job. The air was cool, and I was comfy in my favorite red flannel yard shirt.

It was indeed a good afternoon to work on the boat.


It was time to sand the 2nd layer of epoxy on the trolling motor mount, in preparation for a third coat. I learned a lesson the last time I did this. If you use this type of sanding block, that part of the sandpaper folded backward into the handle will scuff up surfaces you don't want it to.

Like this.

I was happy to find these parallelogram-shaped sanding blocks at Lowe's.  The angled sides help you avoid scratching up unwanted surfaces. Very nice for detail work.

Trolling motor mount, with its 2nd layer of epoxy sanded in preparation for the 3rd layer.

Taped off and encapsulated. 

Here's the 2nd layer of paint on the floor batten "repair," (center diagonal). This is sanded in preparation for a 3rd coat of paint.

Aa the 3rd layer of paint dried, I glued down the new battery tray with thickened epoxy. 

After the 3rd coat had dried for about an hour and a half, I painted on a thin 4th coat. I didn't sand before the 4th coat... hope I don't wind up regretting that.


"In every thing give thanks: for this is the will of God in Christ Jesus concerning you."
— 1 Thessalonians 5:18

Thursday, March 14, 2019

Watching paint dry

I sanded yesterday's thin layer of paint, and then painted on a second very thin layer today.

Yesterday's paint.
Wait for it....

Today's paint.

Wednesday, March 13, 2019

A short post about a very thin layer of paint


The floor batten repair / update project continues on the Utility. After two coats of epoxy and a little more sanding, I finally started painting the "fixed" area. 

Too much of the paint is peeling off from my last such "repair" to this boat. I'm not exactly sure why. My guess is that there is not enough physical adhesion of the new layer onto the old layer. Perhaps I didn't sand between layers enough. Perhaps I put the paint on too thick. Perhaps too much standing water had something to do with it.

In any case, and in hopes of a better job this time around, I sanded the area better this time in preparation for the new paint. Then I painted on a very thin layer with a foam brush.

Monday, March 4, 2019

Varnish done on Percy's new battery tray

After the last 2 coats of varnish dried, I decided that was enough for the battery tray. It's not a work of art (and it was never meant to be), but it looks pretty decent for what it is.

The new battery tray, varnished & with the latches reattached.

Hopefully, I'll be able to install it soon. I'm looking forward to getting Perseverance back out on the water.

Epoxy and varnish work continues on the trolling motor bracket, and the floor battens need to be painted.