Tuesday, February 26, 2019

Epoxy. Think of it as the varnish before the varnish.

The rain stopped. The sun came out. 

I pulled back the cover on my little boat, and let it dry out in the fresh air for a couple of days. 

It needed to dry out, because the rain is coming back. Before that happens, a couple of sanded areas needed another layer of epoxy to water-seal the exposed wood. 

Today was a good day for that. It was a quick project, and a nice break from the tedious varnishing I've been doing otherwise — even though the two are related.

The epoxy goes on before the varnish.

This is how Perseverance's floor looked before I dried it out & let her sit for a couple of days.

2nd layer of epoxy on the sanded floor batten.

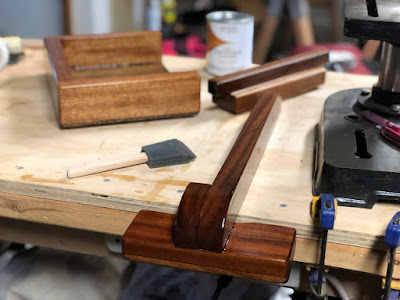
Here's the trolling motor bracket that I've been varnishing. It bolts onto a mating piece that is permanently attached to the inside of the transom. That piece needs varnish, too. But before that... epoxy.

And here is that mating piece. It got one layer of epoxy on it last year. Here it is, sanded and taped in preparation for the second coat.
Et voilĂ ... here is said second coat.
So while I was at it, I decided to also do a little epoxy work on the Zip.


Here is the cherry instrument inlay for the dash board. One layer of epoxy on the front... sanded in preparation for a second coat.
And here's that second coat of epoxy. I think this piece will be really pretty once it's varnished. But, that'll be a while.

Sunday, February 24, 2019

Rain, Epoxy, Rain, Varnish, Rain... and more Rain.

In the last post, we left off with a quick epoxy job I did on the Utility, ahead of some impending rain.


My quick layer of epoxy.

And rain, it did. Non-stop. For days on end. So much rain that it has caused damaged roads, flooding, and even a mudslide that took out a local restaurant.

But today, the sun came out.

So, let's take a look at that epoxy job...


Here it is.

Sure, the boat got some water in it. But, given the amount of rain, it wasn't too bad. The area that had been sanded to bare wood was mostly out of the water, but just barely.

The drain tubes did their job, and I dried out what was left with a couple of towels. To the touch, the Silvertip epoxy appears to have cured fine. However, that was a VERY thin layer, and I'm not convinced that it kept the water out completely.

It's not supposed to rain again for a few more days, so I left the boat uncovered to air out & dry. Then, I'll put another coat of epoxy on before I start repainting this area. 

One thing I've noticed at the back of the boat...


The paint on those parts of the floor that have had standing water in it for long periods is starting to peel. I'm going to have to keep an eye on that.

And, progress continues on the battery tray and trolling motor bracket...

Sand. Varnish Repeat.


Sand...

Varnish...


Thursday, February 21, 2019

Tedious little winter projects

In anticipation of the upcoming boating season, I've shifted my focus somewhat from the Zip back to the Utility and getting it ready for the water.

One of the changes I'm making is to relocate the battery from underneath the foredeck to underneath the rear thwart. This is to make it easier to use my trolling motor, but also for improved overall convenience. (It was really awkward to pull the battery out from under the deck to charge it.)

To that end, I've been varnishing the new battery tray, as well as the removable bracket for the trolling motor. They still need a couple more layers of varnish, but they're getting there.

The new battery tray & trolling motor bracket.
Since these are fairly minor, secondary pieces, I haven't bothered straining the varnish for them. I've simply been using the Pettit Captain's Varnish right out of the can with disposable foam brushes. I've found that these work MUCH better than the cheap disposable chip brushes, as they apply the varnish evenly & don't leave bristles stuck everywhere.

I've also been cleaning up some of my earlier workmanship.

When I built the Utility, I left gobs and globs of epoxy to cure everywhere throughout the interior — especially along the floor battens. These spots are rather unsightly, and I've been cleaning up some of them a little at a time. 

Here are some progress photos of the latest area I'm working on. This is at the aft of the boat, near the spot for the new battery tray:

Look at that messy epoxy job! (At least I know that floor is glued down solidly.)
You can also see chip brush bristles stuck in the paint.

Here, I've sanded away some of that mess.

Re-coating the exposed wood with epoxy.
In some places, I had sanded through the paint and underlying epoxy to the bare wood. Since this area is prone to collecting water, I needed to re-coat those spots with epoxy. Unfortunately, the weather forecast was for cold temperatures and rain for the entire coming week... all due to start the following morning.

I didn't want to risk that exposed wood getting wet, so I quickly applied a thin layer of Silvertip epoxy and pulled the cover over the boat. That was at about 4:30 in the afternoon. By midnight, the boat cover had snow and ice on it.

I have long been impressed with the System Three Silvertip epoxy, and its ability to cure at low temperatures and high humidity. However, the mid-to-low 30's — outside in the rain and snow — was pushing it a bit. I'm anxious to see how it did.

So far, I haven't been able to pull the cover off the boat. It's been raining nonstop for days.