The book states that fiberglass cloth does not easily, or readily, adhere to sharp edges, but rather forms a curve.
Now, I won't begin to compare myself to the brilliant and accomplished Mr. Hankinson. He is the established expert, (that book and DVD are worth every penny... and then some). I myself, on the other hand, am stumbling toward completion of my first boat. However... I will mention this from my limited personal experience:
I used rather light fiberglass cloth (6 oz) on my little boat. And yes, I did radius the edges beforehand. From what I saw, light fiberglass cloth like that was very pliable when wetted out with epoxy. Enough so that I think it would conform to edges such as a chine junction or the base of a transom.... edges less than a 90° angle, that is. I'd be less inclined to feel that way about heavier cloth, but light cloth like 6 oz, I THINK might conform to a sharp edge reasonably well. THIS IS A THEORY. I HAVE NOT TRIED THIS MYSELF. However, I think it is at least worth an initial attempt, and I will probably do so later on, on the Zip.
Why does all this matter?
As the book states, "The well-radiused corner required for proper application of fiberglass cloth is not desirable on some areas of certain types of boats. For example, the bottom edge along the transom of high performance boats or the inside edges along sponsons of hydroplanes should have a hard crisp corner for ultimate speed and performance..."
The book then goes on to describe how to create a "crisp" edge with additional layers of fiberglass cloth. I won't get into that method here, because I didn't use it. However, again... I do certainly recommend buying the book (and DVD!).
Now, my little boat with its 8hp motor is anything but a high performance speed boat. However, I still wanted to create a crisp transom edge. I simply did it with thickened epoxy... System Three Gel Magic in a cartridge with a mixer nozzle to be specific. Will it be durable enough to last? Time will tell.
 |
| Radiused edge along the chine and base of the transom. |
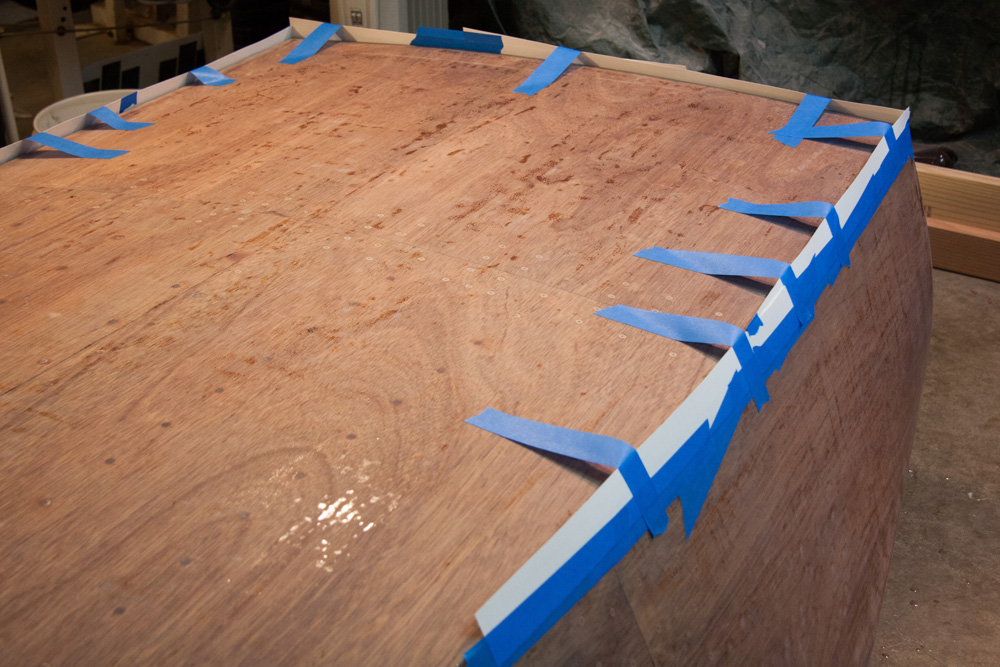 |
| Here, I've taped poster board along the edge to create a form for the epoxy to fill in. |
 |
| After clearing away the tape, poster board, and a lot of sanding, (it was an unholy mess!)... the base of the hull looks like this. |
 |
| Here's the crisp epoxy edge at the base of the transom & along the chine. |
 |
| I will have to clean up these scuff marks on the transom. |
 |
A mishap with the tape allowed epoxy to leak out & flow down the transom in one spot. I was able to scrape most of it away while it was still liquid, but I'm still left with more "mess" to sand off of the transom.
If you try this method, keep a close eye on the progress in case of mishaps like this one. It could've been a MAJOR problem if that runoff epoxy had cured.
|
 |
| This is the view along the port chine, where the radiused edge transitions to the filled-in, sharper epoxy edge. |
No comments:
Post a Comment